The scanned well records include the history and logs that compose the hard-copy well files.
No information on confidential wells is available through this website. Go to the
WellSTAR application.
DISCLAIMER
Any reference from our Web server service to any nongovernmental entity, product, service, or body of information does not constitute an endorsement or recommendation by the Division. The Division is not responsible for the contents of any "off-site" web pages referenced from Division web servers.
The first screen is the selection criteria to use to find wells. Wells can be found based on the County, Field, Operator names, or location, or the API number.The Search Wells button brings up a list of wells that meet the selection criteria that you have specified. Clicking on the API number brings up the well information screen.
NOTE: The well status codes are as follows:
A = active
I = idle
P = plugged
U = unknown
C = cancelled
B = Buried-Idle
Once you've located the well of interest via the selection criteria, a window will display well information at the top, and the various scanned well record files underneath the well information header. To open and view a file, click on the file name highlighted in blue.
District 6
The naming convention for the scanned well files is: API number, type of file, and the effective date of the data. The type of file names used include:
Data = history, summary, permits, tests, applications to do work, and all other 8.5”x11” documents·
Log names include:
1. The scale (2 or 5-inch)
2. The type (Dual Induction, Mud, Sonic, Neutron Density Gamma ray, Cement Bond Log, Other)
3. The run number
EXAMPLES:
2DIL1 = 2” Dual Induction Log, run 1
5DIL2 = 5” Dual Induction Log, run 2
2MUD1 = 2” Mud Log, run 1
Other Districts
Log names are the actual name of the log with scales included in the name if other than the 2” scale and the date is the actual date that the log was run. Exceptions to this are for multiple runs that are found on a single presentation then the date is the last date that is found on the presentation. For a complete list of logging runs along with logging intervals contact the District office.
Information for printing logs on either
large plotters or
desktop printers can be found below.
If you need to download a software package, either select one of the examples below or use the keywords TIFF Viewers and a search engine like to search on the Web. Then follow the installation instructions for installing the viewer on your computer. Most of these applications will automatically install on your system and be configured with your browser.
For Windows platforms:
The built-in Photos app for Windows and Microsoft Paint have the ability to open TIFF files. These are native to Windows 10.
Shareware viewers for Windows platforms:
AlternaTiff by Medical Informatics Engineering
Commercial TIFF Viewer Plugins for Netscape or Internet Explorer:
VuePrint by Hamrick Software
ViewTiff by Accodex Imaging Systems
LAS File Viewers:
LAS File Viewer from the Kansas Geological Surveys, GEMINI Project
Free Software Utilities from Schlumberger
Printing TIFF Files
Please refer to your TIFF viewing software for printing instructions. Several commercial blueprinting Companies throughout the state will accept copies of files that can be downloaded from our site. They will accept the file, print out a copy per your instructions and mail you a copy of the log.
Printing well log PDF files on a large continuous- roll plotter
1. Open PDF file in Acrobat; note the physical size of the log in the lower left corner of Acrobat (physical size, i.e., 9.81" x 146.78"). In Acrobat Reader, go to File>Properties to see the page size.
2. Open the "Print Setup" dialog box from file menu.
a. Choose printer (HP1050C or similar), and click "Properties" box.
b. Under "Paper Size" tab, click on "More sizes…."
c. Under "Custom Size" key in a paper size big enough to accommodate the file, leaving several inches extra. In this case the paper size is set to 12" by 160". This will result in a little excess paper. Click "OK".
d. Orientation should be set to Portrait by default.
e. Set paper type to plain or whatever type you will be plotting on.
Back in the "Print Setup" dialog box, click on "Fit to this page". Go to "ZoomSmart" dialog area, click on "More sizes…." and again enter your page size, 12" by 160". Exit "Print Setup" by clicking "OK".
3. From the File menu, click on the “Print” dialog box, and your printer and page size should be as you set it. You should see a preview image on the right side of the box of how the plot will look. IMPORTANT: click on the “Advanced” button in the lower left corner of the dialog box, and make sure that “Print as image” is clicked in the next box shown. In Acrobat Reader, when you click on “Advance”, “Print as image” may be grayed out (as may the entire contents of the “Advanced Print Setup” dialog box), but it will still work. Make sure “Page Scaling” is set to none. “Auto-Rotate and Center” controls where on the paper the pdf will plot. Clicking it on will force image to center of paper. Otherwise, the image will plot close to the left edge of the paper.
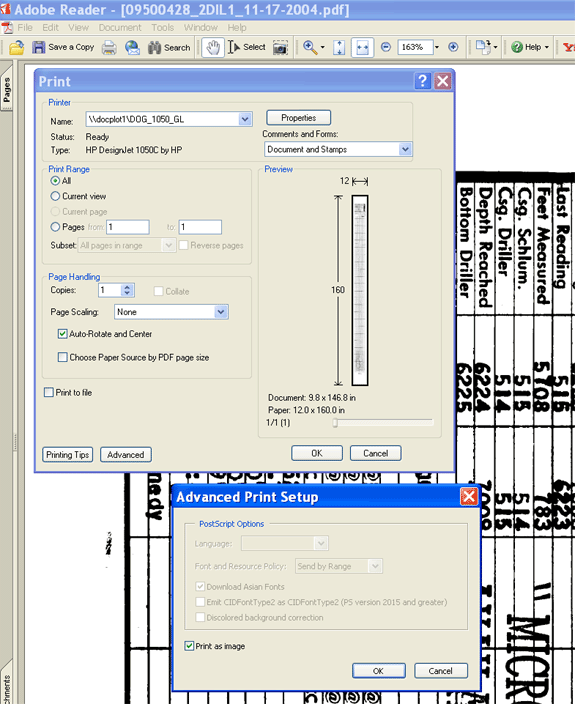
4. Click on "OK" to start plot.
NOTE: you will notice several other settings options while you’re in these dialog boxes. The procedures only deal with the settings that are crucial to making the PDF print. All other settings are default and don’t need to be dealt with (for instance, paper source does not need to be toggled to roll)
1. Open well log file using the full version of Adobe Acrobat v6 or newer software (NOTE: Adobe Reader cannot be used to print logs unless you use the "page down, Print-Current Page" feature and print one page at a time.)
2. Go to File>Print As you can see, the entire well log is displayed.
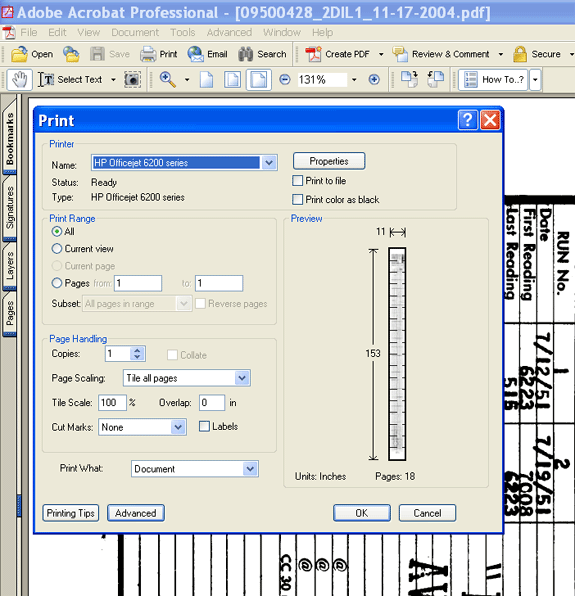
3. Click on the printer “Properties” box and set the page layout to “Landscape”.
4. Under Print Range, make sure that range is set to “All”; notice that this file is considered to be one page long, but spans several pages.
5.
Very Important!
a. Page Scaling should be set to “Tile All Pages”
b. Tile Scale should be set to 100%.
6. Click OK to print well log.
7. Tape pages together being very careful to maintain log scale.
